Friday, December 5, 2008

Roofing Starts

The central flat section is fully covered by the first layer of plywood, temporarily covered with plastic. This view of the entry, with the "front door" being on the right.


A large support beam, for the sloped sections over the living/dining space, goes up next. The rafters are then run from the steel, across that beam, down to the flat roof.


The emerging triangular space between the roof line and top pf the wall is where clerestory windows will go. That single piece of wood, taking the slope further out, shows the the depth of the planned roof overhang (or eaves.)

Thursday, November 13, 2008

Interior Walls and Roof Beams

Interior walls, including the garage, are now framed out.


Roof beams of engineered lumber start to go up.


Friday, October 31, 2008

The walls start to go up

The first wall is the "burnished" block "feature wall." It, along with the steel framework on the other two sides, will support the clerestory windows in a the sloped roof.


The rest of the external walls are SIPs (structurally engineered panels) a sandwich of strandboard and foam insulation. Note the the pre-drilled runs for electrics etc.


The 9' 6" high SIPs are mounted on 2 x 4 floor plates, nailed along those edges, and then vertically connected with a 4" wide "bridge SIP" which is screwed through on each edge. The tops are then connected horizontally with bridging 2 x 4's. The SIPS are also sequenced to allow a 2 x 4 insert in the vertical edge wherever an internal wall will run 90 degrees from it. Window openings will be cut in later.


Note the floor plates for the internal walls, which will be conventional 2 x 4 framing, as that allows easier access for most of the plumbing.

Saturday, October 11, 2008

Radiant Heating Install and Slab Pour

A busy three days this week, that firstly saw the completion of the radiant heat installation.


Then the pouring of the concrete slab, which will be our selected floor in several parts of the house, after more finishing and polishing.


Tuesday, October 7, 2008

Foundations and the first vertical elements


September saw all the foundation work finished and the steel work being installed. These pieces, one at each end of the house, will support the upward slops of the butterfly-style roof, with the top openings holding the clerestory windows.

The one in the photo will be at the end of our living room and will also contain a 20 feet wall of glass, with the center 10 feet being sliders that will open on to the patio.

As I write this, the radiant floor heating is being installed and the slab will be poured this week.

Tuesday, August 19, 2008

The Build finally starts

Last week saw actual build activity in that the footings were dug. Now it's starting to feel we are making progress.
The first picture shows the fully compacted site -- those strange markings coming from the compacting roller on the left.
The second shows the footings awaiting inspection before the form work can be built for the foundation walls.

Sunday, July 20, 2008

And we thought soil was just soil

Once the site was cleared, our builder raised some questions about the nature of the soil, given our plans.

We were obviously aware that the center of the site was higher than the sidewalk (formally validated by a survey) and our design took advantage of this to provide interesting steps up to the front door. We also wanted to ensure the sliders out to the patio did not require a step down, so the house is designed on two levels, with the kitchen and dining/living area being 1 foot lower than the rest, something which cannot be seen from the outside. To achieve this, we knew we would need some soil to be taken out.

Our builders concerns related to the nature of the soil -- '' a lot of organic matter" -- and why our lot had that "domed" perspective when the others nearby did not. So he suggested a soil test, which involves soil engineers drilling and taking core samples. The results were not good for a slab-based house, particularly one in an earthquake zone, and were advised to have the soil compacted.

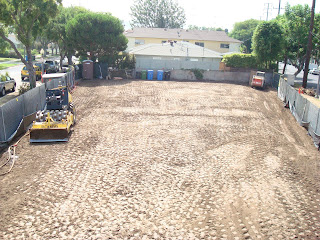
This involved his folks, using special rented machines, digging out the soil and recompacting back in layers, with the soil engineers retesting at each stage. A costly, non-budgetted, item which added 4-5 weeks to the timeline.

This picture illustrates what went on. We gather that the neighbors thought were building a basement!

Sunday, May 18, 2008

Demo and site prep

Pictures of the demolition -- note the cut-down trees, which were diseased Eucalyptuses. Several neighbors later commented they were glad these had gone as they were always shedding and made the whole area look messy.

Also, the first photo's perspective makes the site look a lot narrower than it is.


Thursday, May 15, 2008

Obtaining planning permission

Our plans were finally submitted at the end of March -- about a month later than we had hoped -- and while Culver City states 10 business days for review, there was inevitably some "back and forth" and then a delay because of our patio cover plans.

This came about because the covered patio "structure" intrudes into the setback area on the house frontage street and we had assumed that this would not be of concern because it would be behind a fence. So we had to submit some supporting documentation related to why we need to do this because of our triangular lot.

So it was mid-May before we were finally signed off and folks who are experienced in this stuff tell us that getting it in 6 weeks was still really fast.

Friday, January 18, 2008

Key decisions within the design details

Once you get into the design details, you make numerous decisions and we will not attempt to catalog them here. However, to provide a sense of what we saw as key to building a modern and green house, here are some examples:
  • While J wanted a kitchen that is not fully the "open plan" style seen in many modern homes, an acceptance of a design that partly opens the dining room/kitchen wall, with a horizontal "pass-through," plus this wall not going right up to to the sloping ceiling.
  • Aluminum framed windows and exterior doors, both for the look and for no maintenance. All windows and doors going to the ceiling line, again as part of the look.
  • Space-saving, in-wall pocket doors wherever feasible for the interior.
  • No air conditioning so a lot of attention to cross ventilation, facilitated by three center hallway, operable skylights and also an operable internal window above the bedroom doors near these skylights - which also provide more natural light into those areas.
  • The uses of structurally insulated panels (SIPS) for external walls, providing greater insulation and less waste from stick-frame construction. (Our builder had used these on a recent house.)

Tuesday, January 15, 2008

Developing the plan details: Lessons learned

Moving through the details of the design and plans was an interesting, sometimes frustrating, ride and we occasionally had to negotiate with our architect as to what we considered appropriate steps in the design process.

For example, our builder had provided a fairly detailed, line item estimate, based on recent houses using comparable materials and finishes. So, starting on the detailed design of windows and glass/metal framed exterior doors (W&Ds), we would check with him as to what assumptions he had made to get to his #. We would then use his #s to calculate the likely cost of the number and nature of our wish list of W&Ds.

In conversations with our architect about their number, placement, size and operability, we would then raise cost parameters and his responses left us feeling he was less cost sensitive than us. In discussing this, he defended his process as "you do not design to a budget" but develop your design and then cost it and "re-engineer" if necessary. Given we had that detailed, line item estimate/budget, we wanted to limit the number of costing and re-engineering steps. So we ended up "negotiating" a design process we could all live with.

So we offer the following counsel to anyone reading this with the intent of building their own home:

1. Have your architect articulate his/her design process, preferably with examples, from Day One and, if necessary, amend the process so you are all comfortable with it. Also, have a "process check" discussion every now and again.
2. Try to find a builder who'll provide a detailed, line item estimate/budget based on a "Preliminary Bid Instructions" package, to learn what the major cost drivers are. If some elements are not yet included, keep them on the list as pending, so you do not lose track of them.
3. Remember that the builder has made certain assumptions for each line item, so whenever you feel that your more detailed design and material choices for a particular element might be problematical, check with him/her.
4. Take full advantage of your builder's and/or architects access to current houses when you want to remind, or educate, yourself about what certain materials look like "in situ" or how certain things work, like the different window operability options. You never want to end up saying "I didn't know it would look, or work, like this!"